If you’re finding me through the One Room Challenge, welcome to my home on the internet! I’m Avery and I live in a charming 1910 Craftsman style home in rural Iowa with my husband. You can learn more about me here, and see some of my previous design work in my kitchen, and my Fall 2018 One Room Challenge: Cozy Eclectic Master Bedroom Reveal. My design style is cozy, whimsical, and collected. You can follow along with my homemaking adventures on the Holland Avenue Home Instagram.


Need a quick recap of my One Room Challenge progress so far?
Catch up on all six weeks of my Spring 2019 One Room Challenge:
Week 1: High Style, Low Budget Sunroom Transformation
Week 2: DIY Tree Stump Coffee Tables
Week 4: DIY $150 Bed Swing and Painted Concrete Floors
Friends, we made it to the finish line. Six weeks of painting, building, creating, sewing, cleaning, styling, shooting, writing, editing, posting, and cheerleading have come to an end. I would like to thank Linda and the whole One Room Challenge team for hosting this inspiring event, and for creating a community of encouraging designers and refreshing designs.
This round of the One Room Challenge has given me incredible confidence not only in my design vision, but in my ability to execute that vision through a fiery ambition to “do it myself”. I have grown so much as a designer, blogger, photographer, creator, and nailgun-wielder in the last six weeks, and am very proud of the work I’ve done. I can’t wait to share my transformation with you. Now let’s get on with it!
The “Before”
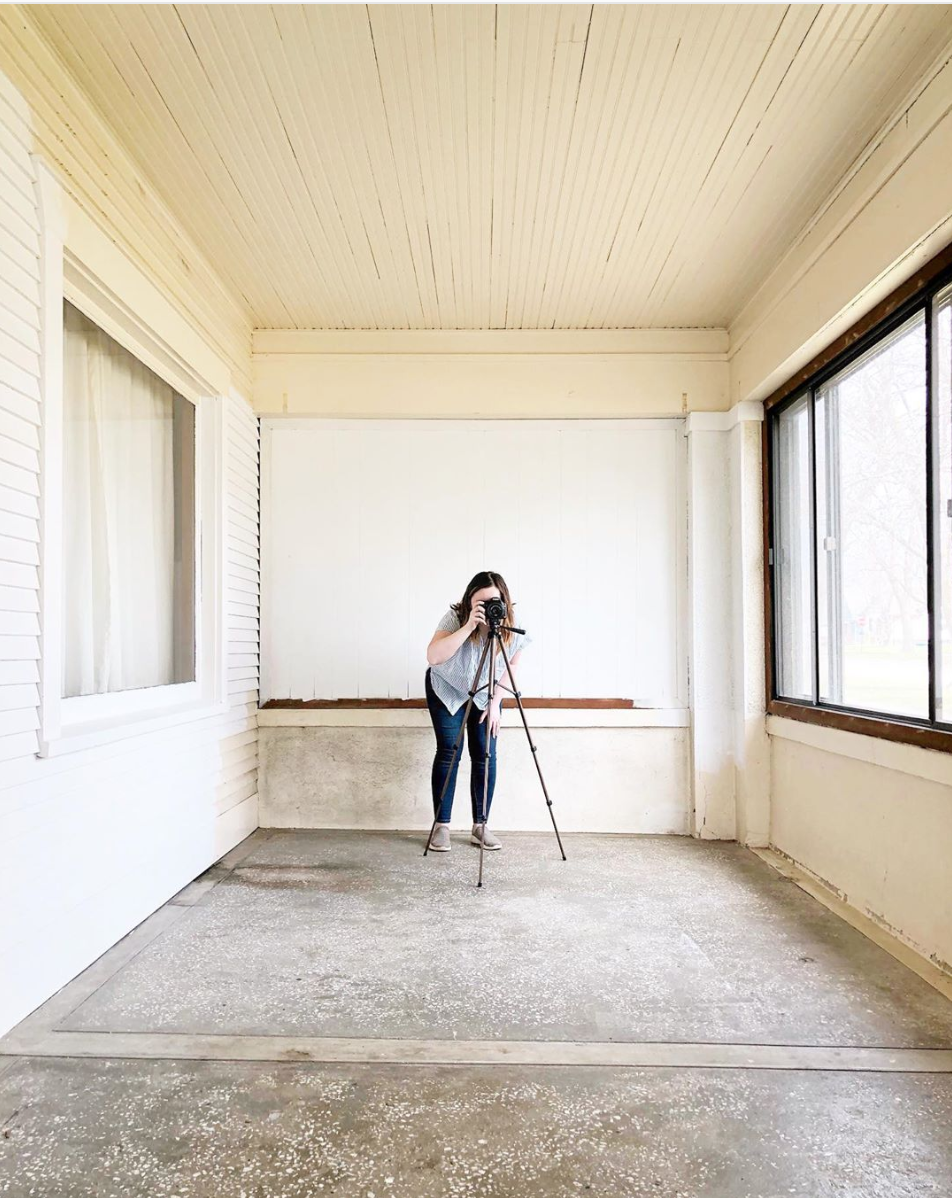
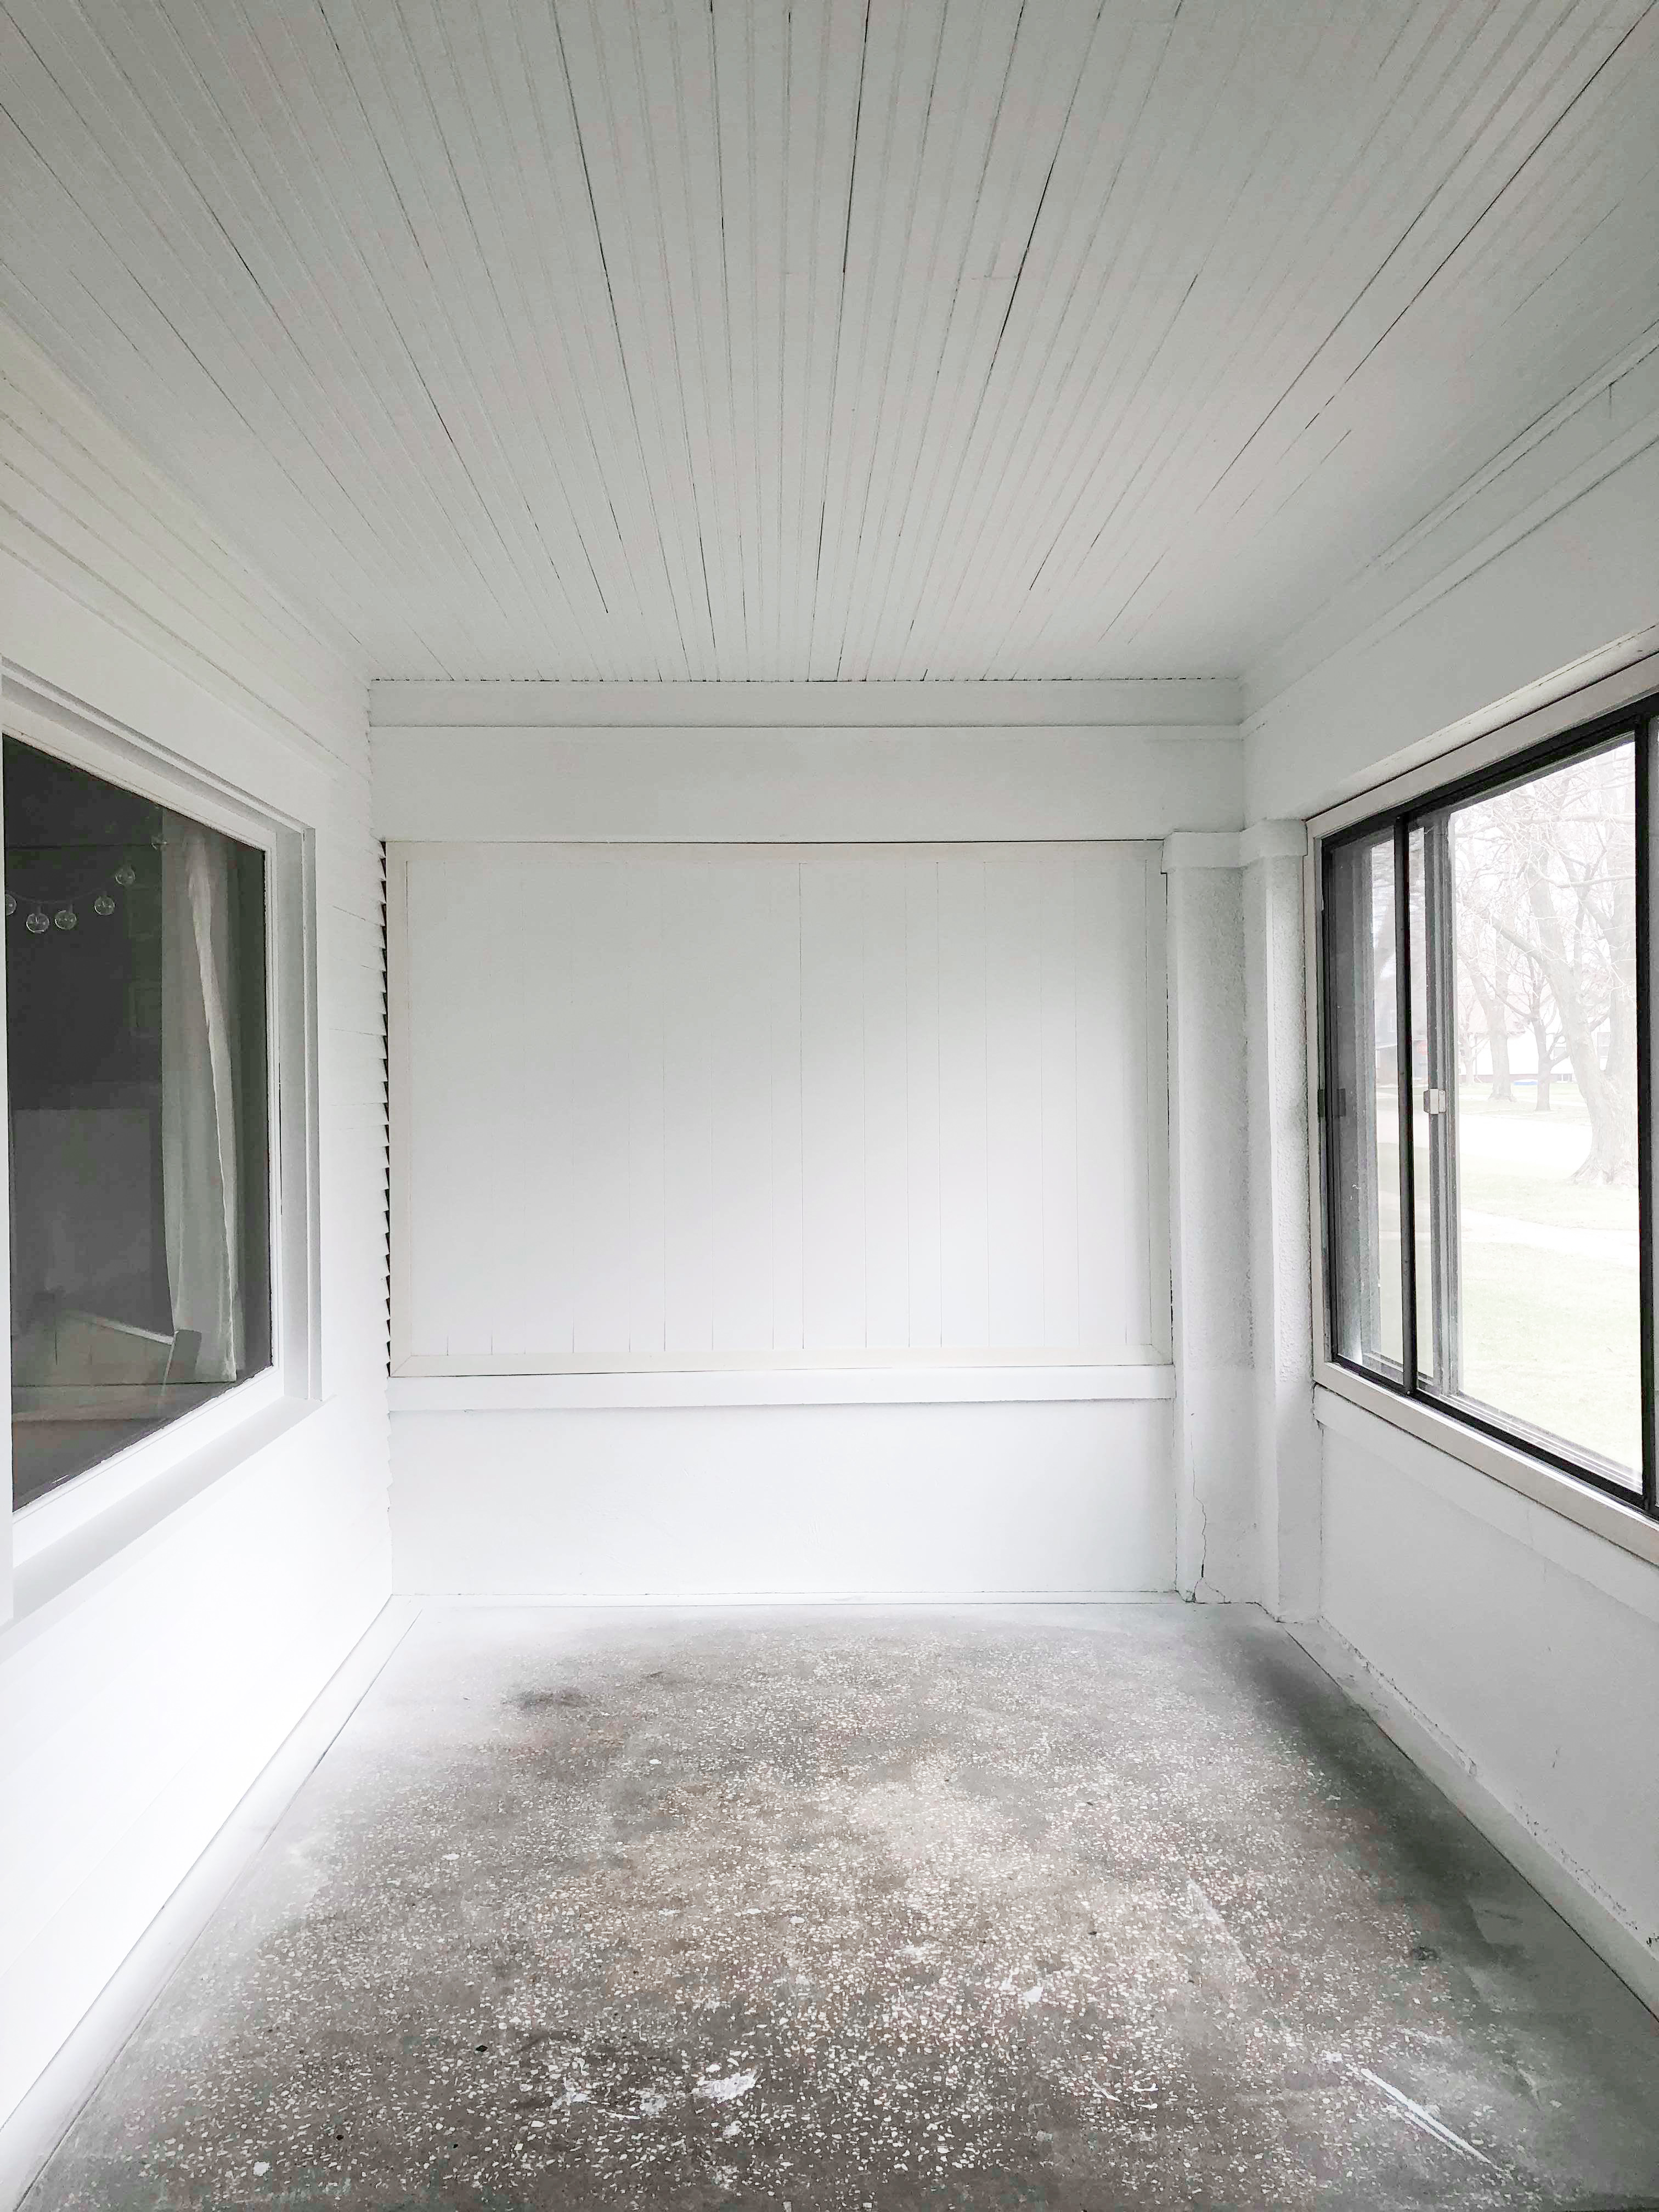
This is where we started six weeks ago. Our front porch sunroom looked like a crime scene. The crime? Sadness, darkness, neglect, and all-around grossness. I see people complain about “before & after” type posts by saying that, “The before photos are edited to make it look worse. The biggest ‘transformation’ is the photography improvement.” When you look at these “before” photos, keep in mind that I used the exact same camera and the exact same editing tools to make this “before” look as good as it could in a photo. It really was that sad.


The walls are partially painted white because I spent hours out here with a paint brush (due to the siding and wall texture) and never finished. Which left us with a partially painted, freckled concrete floor, yellow-ceiling room.
The Process
Over the last six weeks, I have painted every square inch of this space.


We started by spraying the walls and ceiling with Sherwin Williams Extra White. I painted an accent wall with Annie Sloan Chalk Paint Aubusson Blue. Then I painted both doors with Early Riser by Magnolia Home Paints. The window trim is pre-tinted semigloss black by Rustoleum.
These photos prove that paint is the easiest and cheapest way to completely transform a space. The wrong paint color costs just as much per ounce as the right paint color, and making smart paint decisions can really create a “wow” factor.


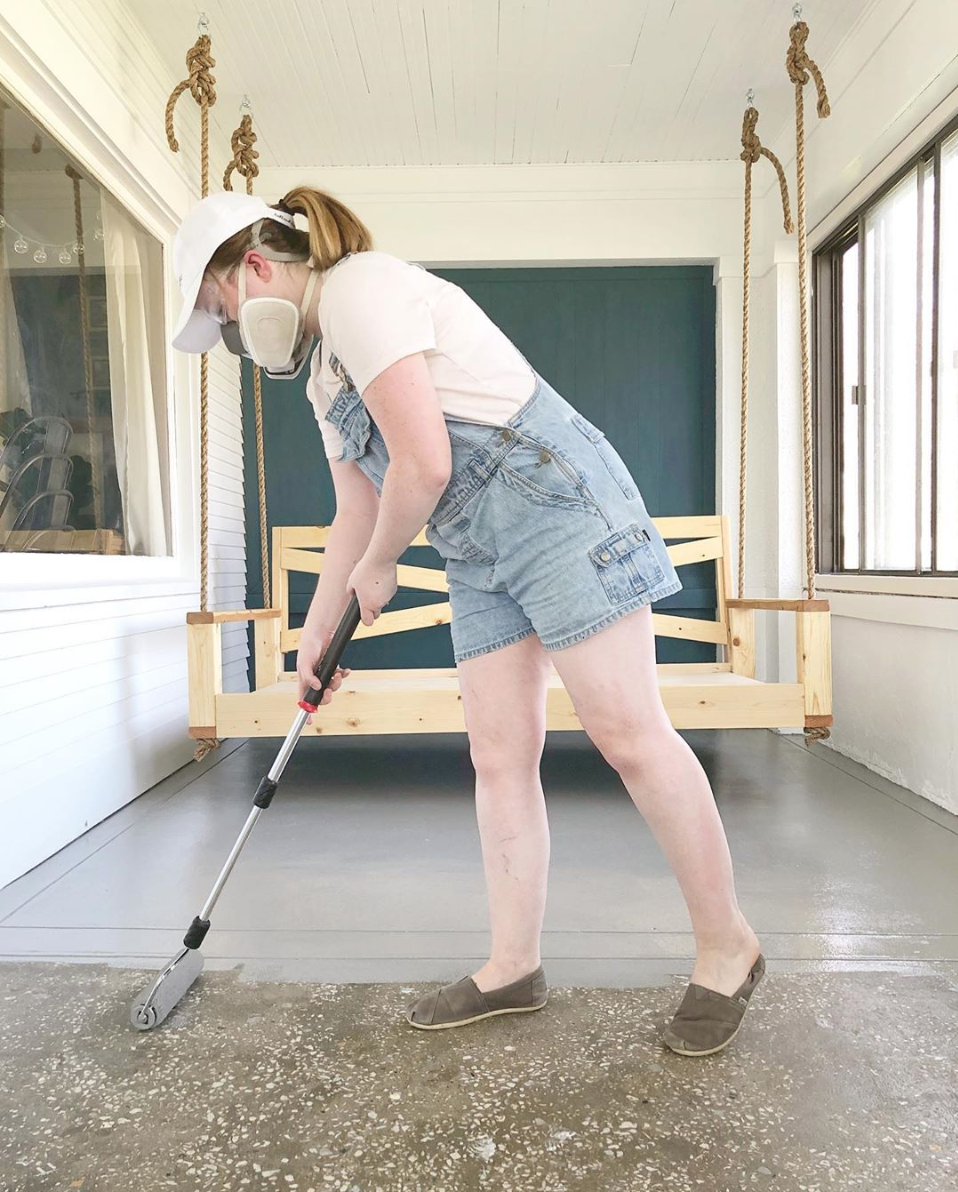
Painting the epoxy floors was terrifying and amazing. I’d never used paint thinner, epoxy paint, or a respirator before this project. But with determination to “do it scared”, leftover epoxy paint from a friend, and two hours on a Tuesday afternoon, I was able to make this sunroom look brand new. 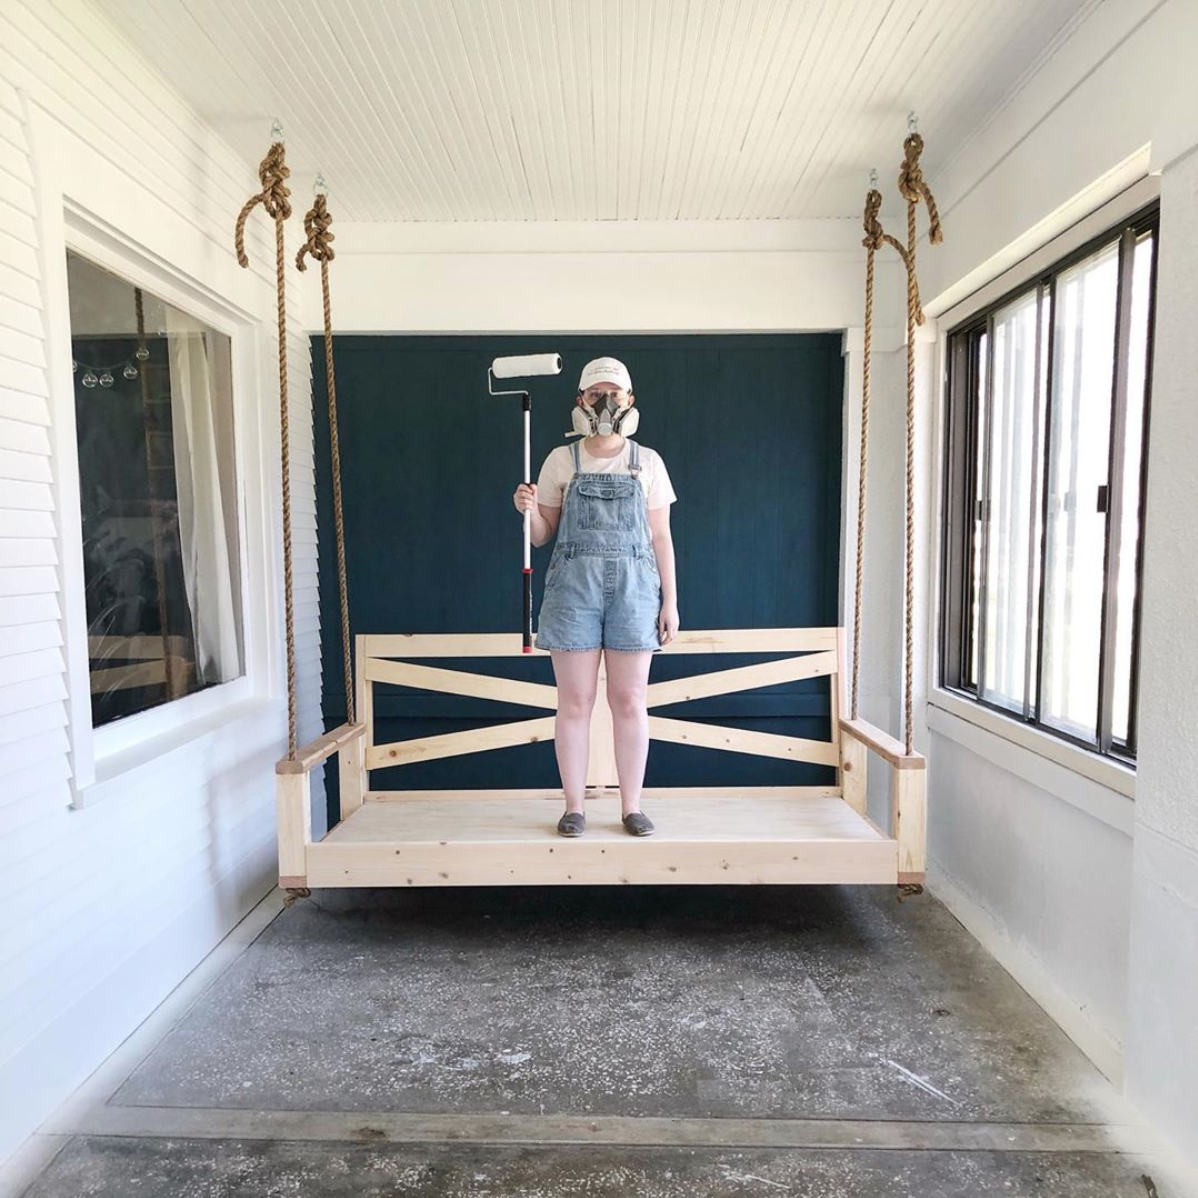


The other big project for this space was building a bed swing. My brother-in-law, Kirk, is incredibly skilled in woodworking, and taught me the basics of building and power tools. We built this DIY $150 Bed Swing on a Saturday afternoon, and it is now the coveted napping location.

The first project I completed for this challenge was creating DIY Tree Stump Coffee Tables from free stumps.


The project that turned this space from a normal sunroom into a high-style, cozy, textured, dreamy wonderland was dyeing my basic Ikea curtains with Rit Dye, and creating a hand-sewn Euro pleat. I will write a full tutorial for this project soon!


The After
I bet you’re probably getting antsy to see the “after” photos. I’ve talked for long enough, and now it’s time to let the photos speak for themselves.
Here’s a reminder of what I started with six weeks ago.
And the “after”—my favorite space I’ve ever created (that I still can’t believe is the same room or in MY HOUSE!).


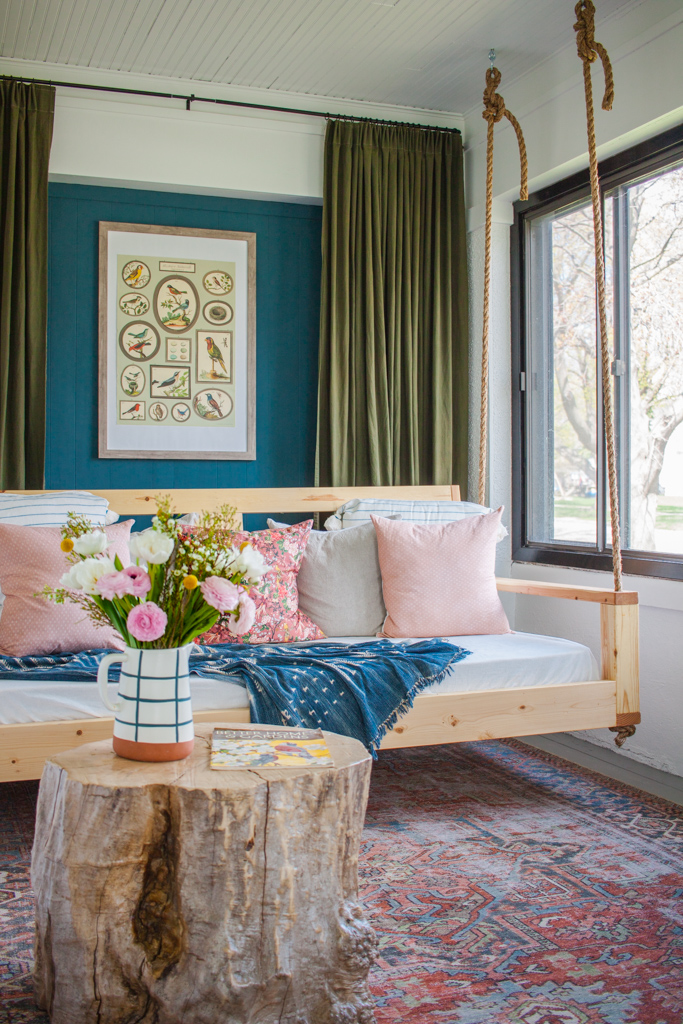

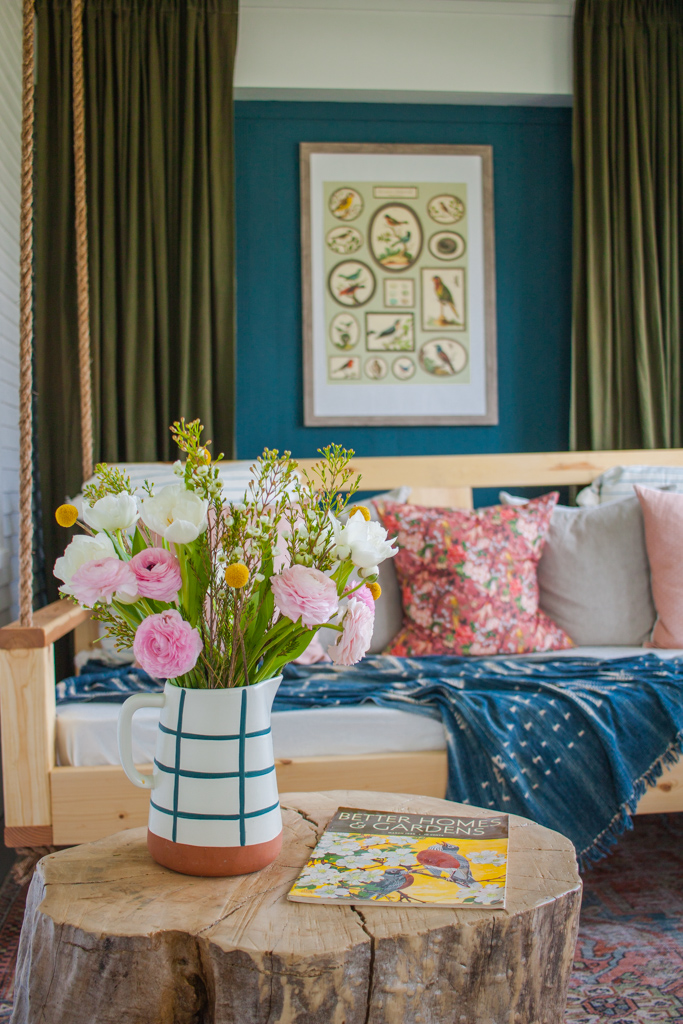
(I picked up this 1935 issue of Better Homes & Gardens at the same antique store that gave me the stumps for free!)


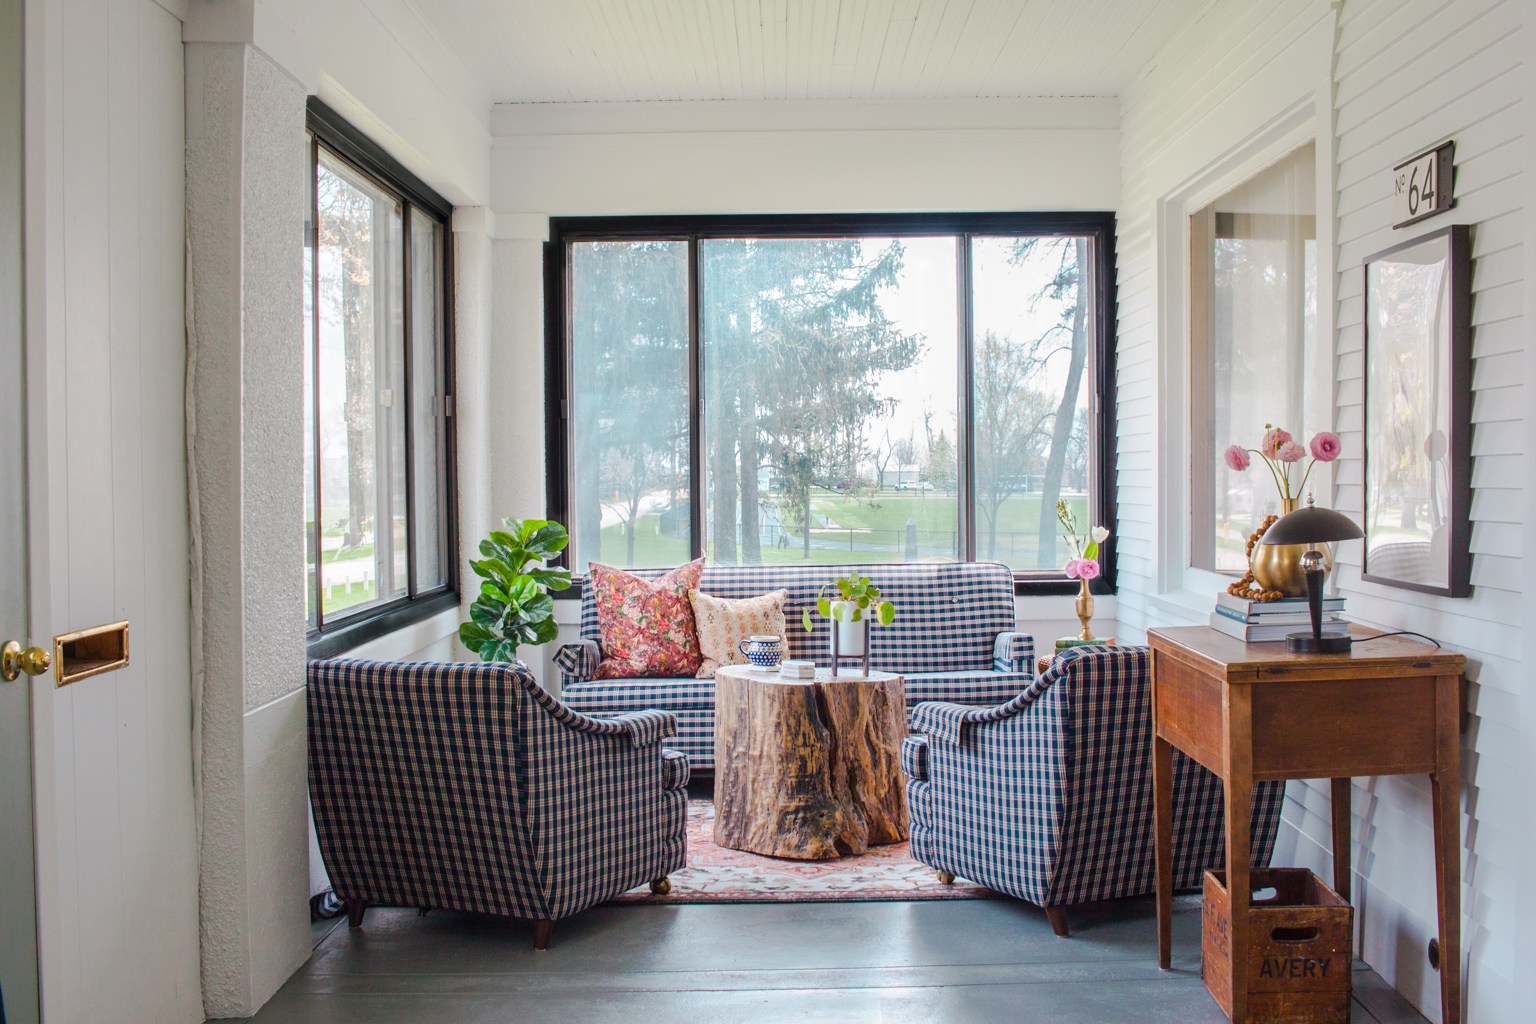
I already had that darling mid-century gingham set. It was $100 on Facebook marketplace last year, and yes, I do feel like the luckiest woman in the world.

Fun fact: That loveseat is actually a pull-out bed! I couldn’t resist styling this space as a guest room.


Here’s one more visual for the complete transformation of this room.


I estimate that we spent about $650 in this space. Here is a rough budget breakdown of the things we purchased specifically for this transformation. We already had some of the furniture, art, and decor, and a few of the elements were sponsored by brands. Some of these links are affiliate links, which means that I will make a small percent commission (at no extra cost to you) if you decide to purchase anything through one of my links.
Paint: $130
- 5 gallons of white paint: $120 from Sherwin Williams, but we only used 3 of the 5 gallons
- Epoxy floor paint: free from a friend’s project leftovers
- Annie Sloan Aubusson Blue Chalk Paint: Sponsored ($35 to purchase)
- Magnolia Early Riser paint: Leftover from another project
- Rustoleum black paint for window trim: $10
Bed Swing: $200ish for swing and bedding
- Lumber, rope, and hardware from Menards: $150
- Twin mattress: already owned
- Sheets: $2 at a local thrift store
- Striped pillow shams: $40 from Anthropologie
- Down pillow inserts: $4 for 4 at my local thrift store
Drapes: $125
- 4 Ikea Ritva panels, drapery hooks, and curtain rings: $100
- Curtain rod: $25 on Amazon
- Rit Dye: Sponsored ($50 to purchase the quantity I used)
Stump Tables: $20
- Stumps: free
- Polycrylic: $10
- Sandpaper: $10
Rugs: $115
- 6×9 Loloi Loren Terracotta Sky Rug: Sponsored by Rugs Direct ($399 to purchase from Rugs Direct)
- 5×8 Wayfair Bungalow Rose rug: $90 on sale
- 3×5 jute rug from Marshall’s: $25
Other Decor & Accessories: $60
- Sewing table: $10 thrifted
- Black metal lamp: $2.50 thrifted
- Wood bead garland: $0.10 thrifted
- House numbers: $40 from Hearth and Hand at Target
- Gold vase: $14 from Target
Labor: $0 (I didn’t hire out anything for this project. I either did it myself, or utilized the generous help of some talented friends!)
Time: Technically, it is a 6 week challenge. I tweaked my design plan many times, and don’t have a good gauge of how long it took me to design the space. I worked on it occasionally for a few weeks leading up to the challenge. It took two afternoons to finish the stump tables (About 6 hours). About 3 hours to prep and paint the white, and a few hours to paint the accent wall, doors, and trim. Kirk and I spent about 8 hours building and installing the bed swing. I spent two hours painting the epoxy floors, and then let them cure for a whole week before placing any furniture or rugs. Dyeing, pleating, and installing the curtains took about 6-8 hours. My sister-in-law, Sarah, spent a few hours hand sewing pillow covers for the bed swing while Kirk and I built the swing (Thanks, Sarah!). I spent an afternoon (about 3-4 hours) placing the furniture, styling the space with artwork and accessories, and installing the house numbers. I spent around 3-4 hours photographing and editing the final images, and about 2 hours writing the final post. Each week, I spent about an hour writing the posts for weeks 1-5. My husband, Ben, helped me with a few of the projects including prepping the room for paint, installing the curtains, and moving furniture. My friend, Tessa, helped me prep the room for paint. My friend, JJ, did the white paint with a sprayer (in just 30 minutes!). My friend, Sara, helped me tie up loose ends on a few projects one afternoon. My brother-in-law, Kirk, led the bed swing construction all day on a Saturday while my sister-in-law, Sarah, sewed pillows and kept us fed!
I estimate that I spent about 45-50 hours total to complete and document this project, and anywhere from 10-15 hours designing and preparing the space (emptying of furniture and cleaning).
The cost added up to about $650, which is what comparable custom drapes would’ve cost if I purchased them new. Buying a pre-made bed swing runs about $1,000. A similar black metal lamp sells for $200 at Schoolhouse Electric (instead of $2.50 at Goodwill). Half of that $650 budget was just for painting and building a swing, and the rest of the styling was completed for $300 and repurposing things I already had.
That is still a very large amount for us to spend, and we don’t spend that kind of money like it’s nothing. So while the $650 price tag does not feel “low budget” to me, I’ve realized that furniture and projects just cost money. I transformed a neglected, dreary porch into a very high-end space for a percentage of what a similar style would cost if we didn’t have to be resourceful and thoughtful with every purchase.
(The sponsored rug, chalk paint, and curtain dye would’ve added to the budget, so if you wanted to buy everything you see brand new, it would’ve cost a bit more. Still, $1,000ish for a brand new room is less than what you would spend on a designer sofa alone.
My goal with this challenge was to learn new skills and encourage you to have the confidence to learn something new as well. If I can do it, anyone can do it. I wanted to share as much of my process as possible to show that you don’t have to have a ton of money or expertise to make a vision come to life. This space represents resourcefulness, overcoming DIY fears, and a commitment to doing what I love instead of just following what is trendy. I’m not sure if my final space is trendy or not, but I’ve never seen another look quite like it, and it makes me proud of all of the things I created over the last six weeks.
I don’t have any interior design or photography training, but the last 3 years have been full of self-educating and experimenting in my own home. I learned SO much during this One Room Challenge. I learned how to use an electric sander, circular saw, nail gun, and paint sprayer. How to use epoxy paint and a respirator, and how to mask off a room for spraying. How to dye fabric in my washing machine, do a whip stitch to seamlessly finish pillow covers, to use pleating hooks, and how to stitch euro pleats into basic curtains. I discovered that I need a tripod to shoot interiors, and I learned how to use my camera in a whole new way. I learned how to make sure your interior editing doesn’t over-expose your windows. I’ve been studying editorial styling and photography, so I incorporated those skills in this shoot.
If you don’t know how to do something, put on your learning hat and DO IT SCARED. All of those things were intimidating until I decided to learn and do them myself. Reference the internet, books, and your talented friends to learn a new skill, and then get out there and just try it!
I couldn’t have completed this transformation without the help and support of my family and friends. I’d like to thank my husband, Ben, for listening to my constant ramblings and thinking-out-loud, and for supporting my love for design. Ben’s sister, Sarah, and her husband, Kirk, visited for a weekend to help with this space. Kirk designed the plans and led the bed swing project, and Sarah sewed pillow covers. My friends Kyle and JJ from Rent-All in Storm Lake provided tools, assistance, advice, and the epoxy paint. My friend, Sara, came over one afternoon to help me pleat the curtains. My friends Briee, Stephanie, Sydney, and my Mom offered their design opinions throughout the whole process, and collectively responded to approximately two million “What about this?” texts from me.
This project was sponsored by a few great companies that were generous enough to send me products to make my vision come to life. Loloi Rugs and Rugs Direct provided the beautiful Loren rug. Rit Dye provided the dye for my Ikea curtains. Annie Sloan Chalk Paint provided the paint for my accent wall.
Don’t forget to check out the final reveals of the Featured Designers and other Guest Designers on the One Room Challenge Blog.
If you enjoyed following this project, I would greatly appreciate if you shared it with a friend! You can follow along on the Holland Avenue Home Instagram and Instagram Stories for interior styling tips, daily encouragement towards thoughtful and resourceful decorating, and future projects!
Join the Holland Avenue Home- Thoughtful Homemakers Community on Facebook for an inspiring and encouraging community where you can share your projects, ask decor questions, and see behind the scenes of Holland Avenue!
Thank you so much for following my transformation. I hope you leave my blog encouraged and empowered to tackle projects in your own home.
Want to see a few more of my favorite DIY projects?
- The original kitchen Before & After: Before & After: A Bright, Affordable DIY Kitchen Update
- An honest kitchen update: Chalk Painted Kitchen Cabinets Two Years Later
- One Room Challenge Fall 2018: Cozy Eclectic Master Bedroom Before & After: One Room Challenge Week 6
- Creating a Cozy Home Library
- DIY Tree Stump Coffee Tables: One Room Challenge Week 2
- DIY $150 Bed Swing and Painted Concrete Floors: One Room Challenge Week 4
![]()