Before & After High Style, Low Budget Sunroom: One Room Challenge Week 6

If you’re finding me through the One Room Challenge, welcome to my home on the internet! I’m Avery and I live in a charming 1910 Craftsman style home in rural Iowa with my husband. You can learn more about me here, and see some of my previous design work in my kitchen, and my Fall 2018 One Room Challenge: Cozy Eclectic Master Bedroom Reveal. My design style is cozy, whimsical, and collected. You can follow along with my homemaking adventures on the Holland Avenue Home Instagram.

51548685_10213034836807986_5582592877818544128_n

Need a quick recap of my One Room Challenge progress so far?

Catch up on all six weeks of my Spring 2019 One Room Challenge:

Week 1: High Style, Low Budget Sunroom Transformation

Week 2: DIY Tree Stump Coffee Tables

Week 3: The Power of Paint

Week 4: DIY $150 Bed Swing and Painted Concrete Floors

Week 5: Finishing Touches


Friends, we made it to the finish line. Six weeks of painting, building, creating, sewing, cleaning, styling, shooting, writing, editing, posting, and cheerleading have come to an end. I would like to thank Linda and the whole One Room Challenge team for hosting this inspiring event, and for creating a community of encouraging designers and refreshing designs.

This round of the One Room Challenge has given me incredible confidence not only in my design vision, but in my ability to execute that vision through a fiery ambition to “do it myself”. I have grown so much as a designer, blogger, photographer, creator, and nailgun-wielder in the last six weeks, and am very proud of the work I’ve done. I can’t wait to share my transformation with you. Now let’s get on with it!

The “Before”

This is where we started six weeks ago. Our front porch sunroom looked like a crime scene. The crime? Sadness, darkness, neglect, and all-around grossness. I see people complain about “before & after” type posts by saying that, “The before photos are edited to make it look worse. The biggest ‘transformation’ is the photography improvement.” When you look at these “before” photos, keep in mind that I used the exact same camera and the exact same editing tools to make this “before” look as good as it could in a photo. It really was that sad.

58375533_394853021102472_6109931547991736320_nIMG_6774 2.jpg copy

The walls are partially painted white because I spent hours out here with a paint brush (due to the siding and wall texture) and never finished. Which left us with a partially painted, freckled concrete floor, yellow-ceiling room.

The Process

Over the last six weeks, I have painted every square inch of this space.

Screen Shot 2019-04-17 at 9.09.08 PMIMG_8824

We started by spraying the walls and ceiling with Sherwin Williams Extra White. I painted an accent wall with Annie Sloan Chalk Paint Aubusson Blue. Then I painted both doors with Early Riser by Magnolia Home Paints. The window trim is pre-tinted semigloss black by Rustoleum.

These photos prove that paint is the easiest and cheapest way to completely transform a space. The wrong paint color costs just as much per ounce as the right paint color, and making smart paint decisions can really create a “wow” factor.

57226314_424278258133508_3519793550965342208_nIMG_8833IMG_8626 357434219_2286432394939005_496216525397557248_n

Painting the epoxy floors was terrifying and amazing. I’d never used paint thinner, epoxy paint, or a respirator before this project. But with determination to “do it scared”, leftover epoxy paint from a friend, and two hours on a Tuesday afternoon, I was able to make this sunroom look brand new. Screen Shot 2019-04-24 at 6.25.31 PMScreen Shot 2019-04-24 at 6.26.05 PMIMG_8996

The other big project for this space was building a bed swing. My brother-in-law, Kirk, is incredibly skilled in woodworking, and taught me the basics of building and power tools. We built this DIY $150 Bed Swing on a Saturday afternoon, and it is now the coveted napping location.

IMG_8780

The first project I completed for this challenge was creating DIY Tree Stump Coffee Tables from free stumps.

56659900_2359066060990051_699295824831578112_n56902387_345533459421832_1299240947208421376_n

The project that turned this space from a normal sunroom into a high-style, cozy, textured, dreamy wonderland was dyeing my basic Ikea curtains with Rit Dye, and creating a hand-sewn Euro pleat. I will write a full tutorial for this project soon!

267408F6-E6EE-4EEC-9372-517B9A807674

The After

I bet you’re probably getting antsy to see the “after” photos. I’ve talked for long enough, and now it’s time to let the photos speak for themselves.

Here’s a reminder of what I started with six weeks ago.

58375533_394853021102472_6109931547991736320_n

And the “after”—my favorite space I’ve ever created (that I still can’t believe is the same room or in MY HOUSE!).

IMG_8998

IMG_9000

IMG_9004

(I picked up this 1935 issue of Better Homes & Gardens at the same antique store that gave me the stumps for free!)

59700443_353363695526207_230558710647226368_n

IMG_9013

IMG_9005

IMG_9035

IMG_8969

I already had that darling mid-century gingham set. It was $100 on Facebook marketplace last year, and yes, I do feel like the luckiest woman in the world.

IMG_8992

Fun fact: That loveseat is actually a pull-out bed! I couldn’t resist styling this space as a guest room.

IMG_9015

IMG_9019

Here’s one more visual for the complete transformation of this room.

Sunroom Before and After.jpg

I estimate that we spent about $650 in this space. Here is a rough budget breakdown of the things we purchased specifically for this transformation. We already had some of the furniture, art, and decor, and a few of the elements were sponsored by brands. Some of these links are affiliate links, which means that I will make a small percent commission (at no extra cost to you) if you decide to purchase anything through one of my links.

Paint: $130

  • 5 gallons of white paint: $120 from Sherwin Williams, but we only used 3 of the 5 gallons
  • Epoxy floor paint: free from a friend’s project leftovers
  • Annie Sloan Aubusson Blue Chalk Paint: Sponsored ($35 to purchase)
  • Magnolia Early Riser paint: Leftover from another project
  • Rustoleum black paint for window trim: $10

Bed Swing: $200ish for swing and bedding

  • Lumber, rope, and hardware from Menards: $150
  • Twin mattress: already owned
  • Sheets: $2 at a local thrift store
  • Striped pillow shams: $40 from Anthropologie
  • Down pillow inserts: $4 for 4 at my local thrift store

Drapes: $125

Stump Tables: $20

Rugs: $115

Other Decor & Accessories: $60

  • Sewing table: $10 thrifted
  • Black metal lamp: $2.50 thrifted
  • Wood bead garland: $0.10 thrifted
  • House numbers: $40 from Hearth and Hand at Target
  • Gold vase: $14 from Target

Labor: $0 (I didn’t hire out anything for this project. I either did it myself, or utilized the generous help of some talented friends!)

Time: Technically, it is a 6 week challenge. I tweaked my design plan many times, and don’t have a good gauge of how long it took me to design the space. I worked on it occasionally for a few weeks leading up to the challenge. It took two afternoons to finish the stump tables (About 6 hours). About 3 hours to prep and paint the white, and a few hours to paint the accent wall, doors, and trim. Kirk and I spent about 8 hours building and installing the bed swing. I spent two hours painting the epoxy floors, and then let them cure for a whole week before placing any furniture or rugs. Dyeing, pleating, and installing the curtains took about 6-8 hours. My sister-in-law, Sarah, spent a few hours hand sewing pillow covers for the bed swing while Kirk and I built the swing (Thanks, Sarah!). I spent an afternoon (about 3-4 hours) placing the furniture, styling the space with artwork and accessories, and installing the house numbers. I spent around 3-4 hours photographing and editing the final images, and about 2 hours writing the final post. Each week, I spent about an hour writing the posts for weeks 1-5. My husband, Ben, helped me with a few of the projects including prepping the room for paint, installing the curtains, and moving furniture. My friend, Tessa, helped me prep the room for paint. My friend, JJ, did the white paint with a sprayer (in just 30 minutes!). My friend, Sara, helped me tie up loose ends on a few projects one afternoon. My brother-in-law, Kirk, led the bed swing construction all day on a Saturday while my sister-in-law, Sarah, sewed pillows and kept us fed!

I estimate that I spent about 45-50 hours total to complete and document this project, and anywhere from 10-15 hours designing and preparing the space (emptying of furniture and cleaning). 

The cost added up to about $650, which is what comparable custom drapes would’ve cost if I purchased them new. Buying a pre-made bed swing runs about $1,000. A similar black metal lamp sells for $200 at Schoolhouse Electric (instead of $2.50 at Goodwill). Half of that $650 budget was just for painting and building a swing, and the rest of the styling was completed for $300 and repurposing things I already had.

That is still a very large amount for us to spend, and we don’t spend that kind of money like it’s nothing. So while the $650 price tag does not feel “low budget” to me, I’ve realized that furniture and projects just cost money. I transformed a neglected, dreary porch into a very high-end space for a percentage of what a similar style would cost if we didn’t have to be resourceful and thoughtful with every purchase. 

(The sponsored rug, chalk paint, and curtain dye would’ve added to the budget, so if you wanted to buy everything you see brand new, it would’ve cost a bit more. Still, $1,000ish for a brand new room is less than what you would spend on a designer sofa alone.

My goal with this challenge was to learn new skills and encourage you to have the confidence to learn something new as well. If I can do it, anyone can do it. I wanted to share as much of my process as possible to show that you don’t have to have a ton of money or expertise to make a vision come to life. This space represents resourcefulness, overcoming DIY fears, and a commitment to doing what I love instead of just following what is trendy. I’m not sure if my final space is trendy or not, but I’ve never seen another look quite like it, and it makes me proud of all of the things I created over the last six weeks.

I don’t have any interior design or photography training, but the last 3 years have been full of self-educating and experimenting in my own home. I learned SO much during this One Room Challenge. I learned how to use an electric sander, circular saw, nail gun, and paint sprayer. How to use epoxy paint and a respirator, and how to mask off a room for spraying. How to dye fabric in my washing machine, do a whip stitch to seamlessly finish pillow covers, to use pleating hooks, and how to stitch euro pleats into basic curtains. I discovered that I need a tripod to shoot interiors, and I learned how to use my camera in a whole new way. I learned how to make sure your interior editing doesn’t over-expose your windows. I’ve been studying editorial styling and photography, so I incorporated those skills in this shoot.

If you don’t know how to do something, put on your learning hat and DO IT SCARED. All of those things were intimidating until I decided to learn and do them myself. Reference the internet, books, and your talented friends to learn a new skill, and then get out there and just try it!

I couldn’t have completed this transformation without the help and support of my family and friends. I’d like to thank my husband, Ben, for listening to my constant ramblings and thinking-out-loud, and for supporting my love for design. Ben’s sister, Sarah, and her husband, Kirk, visited for a weekend to help with this space. Kirk designed the plans and led the bed swing project, and Sarah sewed pillow covers. My friends Kyle and JJ from Rent-All in Storm Lake provided tools, assistance, advice, and the epoxy paint. My friend, Sara, came over one afternoon to help me pleat the curtains. My friends Briee, Stephanie, Sydney, and my Mom offered their design opinions throughout the whole process, and collectively responded to approximately two million “What about this?” texts from me.

This project was sponsored by a few great companies that were generous enough to send me products to make my vision come to life. Loloi Rugs and Rugs Direct provided the beautiful Loren rug. Rit Dye provided the dye for my Ikea curtains. Annie Sloan Chalk Paint provided the paint for my accent wall.

Don’t forget to check out the final reveals of the Featured Designers and other Guest Designers on the One Room Challenge Blog. 

If you enjoyed following this project, I would greatly appreciate if you shared it with a friend! You can follow along on the Holland Avenue Home Instagram and Instagram Stories for interior styling tips, daily encouragement towards thoughtful and resourceful decorating, and future projects!

Join the Holland Avenue Home- Thoughtful Homemakers Community on Facebook for an inspiring and encouraging community where you can share your projects, ask decor questions, and see behind the scenes of Holland Avenue!

Thank you so much for following my transformation. I hope you leave my blog encouraged and empowered to tackle projects in your own home.

Want to see a few more of my favorite DIY projects?


ORC logo

avery- signature

High style low budget cozy and colorful sunroom


Finishing Touches: One Room Challenge Week 5

If you’re finding me through the One Room Challenge, welcome to my home on the internet! I’m Avery and I live in a charming 1910 Craftsman style home in rural Iowa with my husband. You can learn more about me here, and see some of my previous design work in my kitchen, and my Fall 2018 One Room Challenge: Cozy Eclectic Master Bedroom Reveal. My design style is cozy, whimsical, and collected. You can follow along with my homemaking adventures on the Holland Avenue Home Instagram.

Catch up on all of my progress for the Spring 2019 One Room Challenge:

Week 1: High Style, Low Budget Sunroom Transformation

Week 2: DIY Tree Stump Coffee Tables

Week 3: The Power of Paint

Week 4: DIY $150 Bed Swing and Painted Concrete Floors

I wasn’t able to make much progress in the porch, because the epoxy floors needed to cure all week prior to placing the furniture and rugs. I did make progress in other ways, but those projects will have to wait until the reveal next week! I’m pulling together my final styling elements, and plan to style and shoot the space TOMORROW! I will incorporate plenty of vintage accents with soul to add warmth and charm to a space that came together in a quick six weeks.

E9016879-2B36-484C-8EBD-983436C2C657

The main thing I accomplished this week was dyeing my white Ikea curtains with Rit Dye, and customizing them with pleating hooks. (I’ll share a full post about this DIY after the reveal. It will be a nerdy curtain party!)

267408F6-E6EE-4EEC-9372-517B9A807674

The other progress was finally painting the window trim. The windows are black, and the white trim seemed to accentuate the fact that the windows are not white. The white trim made the windows look out of place, so I decided to make the black windows a statement instead! I’m really happy with the dramatic punch that the black trim delivers. If you have an element in your space that looks like it is out of place, consider turning it into a statement. My Mom taught me the importance of having black accents for contrast in home decor. If you’re choosing paint or furniture colors and usually choose white by default, consider choosing black instead. A tasteful touch of black paint can keep things interesting, and will provide contrast and drama for the same price as white paint.

ACS_0670

You can follow along on the Holland Avenue Home Instagram and Instagram Stories for behind-the-scenes progress before it comes to the blog. I’ll be sharing weekly updates here on my blog, and you can get reminders every time a post goes live through entering your email into the “brighten my inbox” tab to the right of this post.

Don’t forget to check out the design plans of the Featured Designers and other Guest Designers on the One Room Challenge Blog. 

Thanks for following along, and stay tuned for next week’s BIG REVEAL!

ORC logo

avery- signature

Catch up on all six weeks of the Spring 2019 One Room Challenge

Week 1: High Style, Low Budget Sunroom Transformation

Week 2: DIY Tree Stump Coffee Tables

Week 3: The Power of Paint

Week 4: DIY $150 Bed Swing and Painted Concrete Floors

Week 5: Finishing Touches

Week 6: Before & After High Style, Low Budget Sunroom


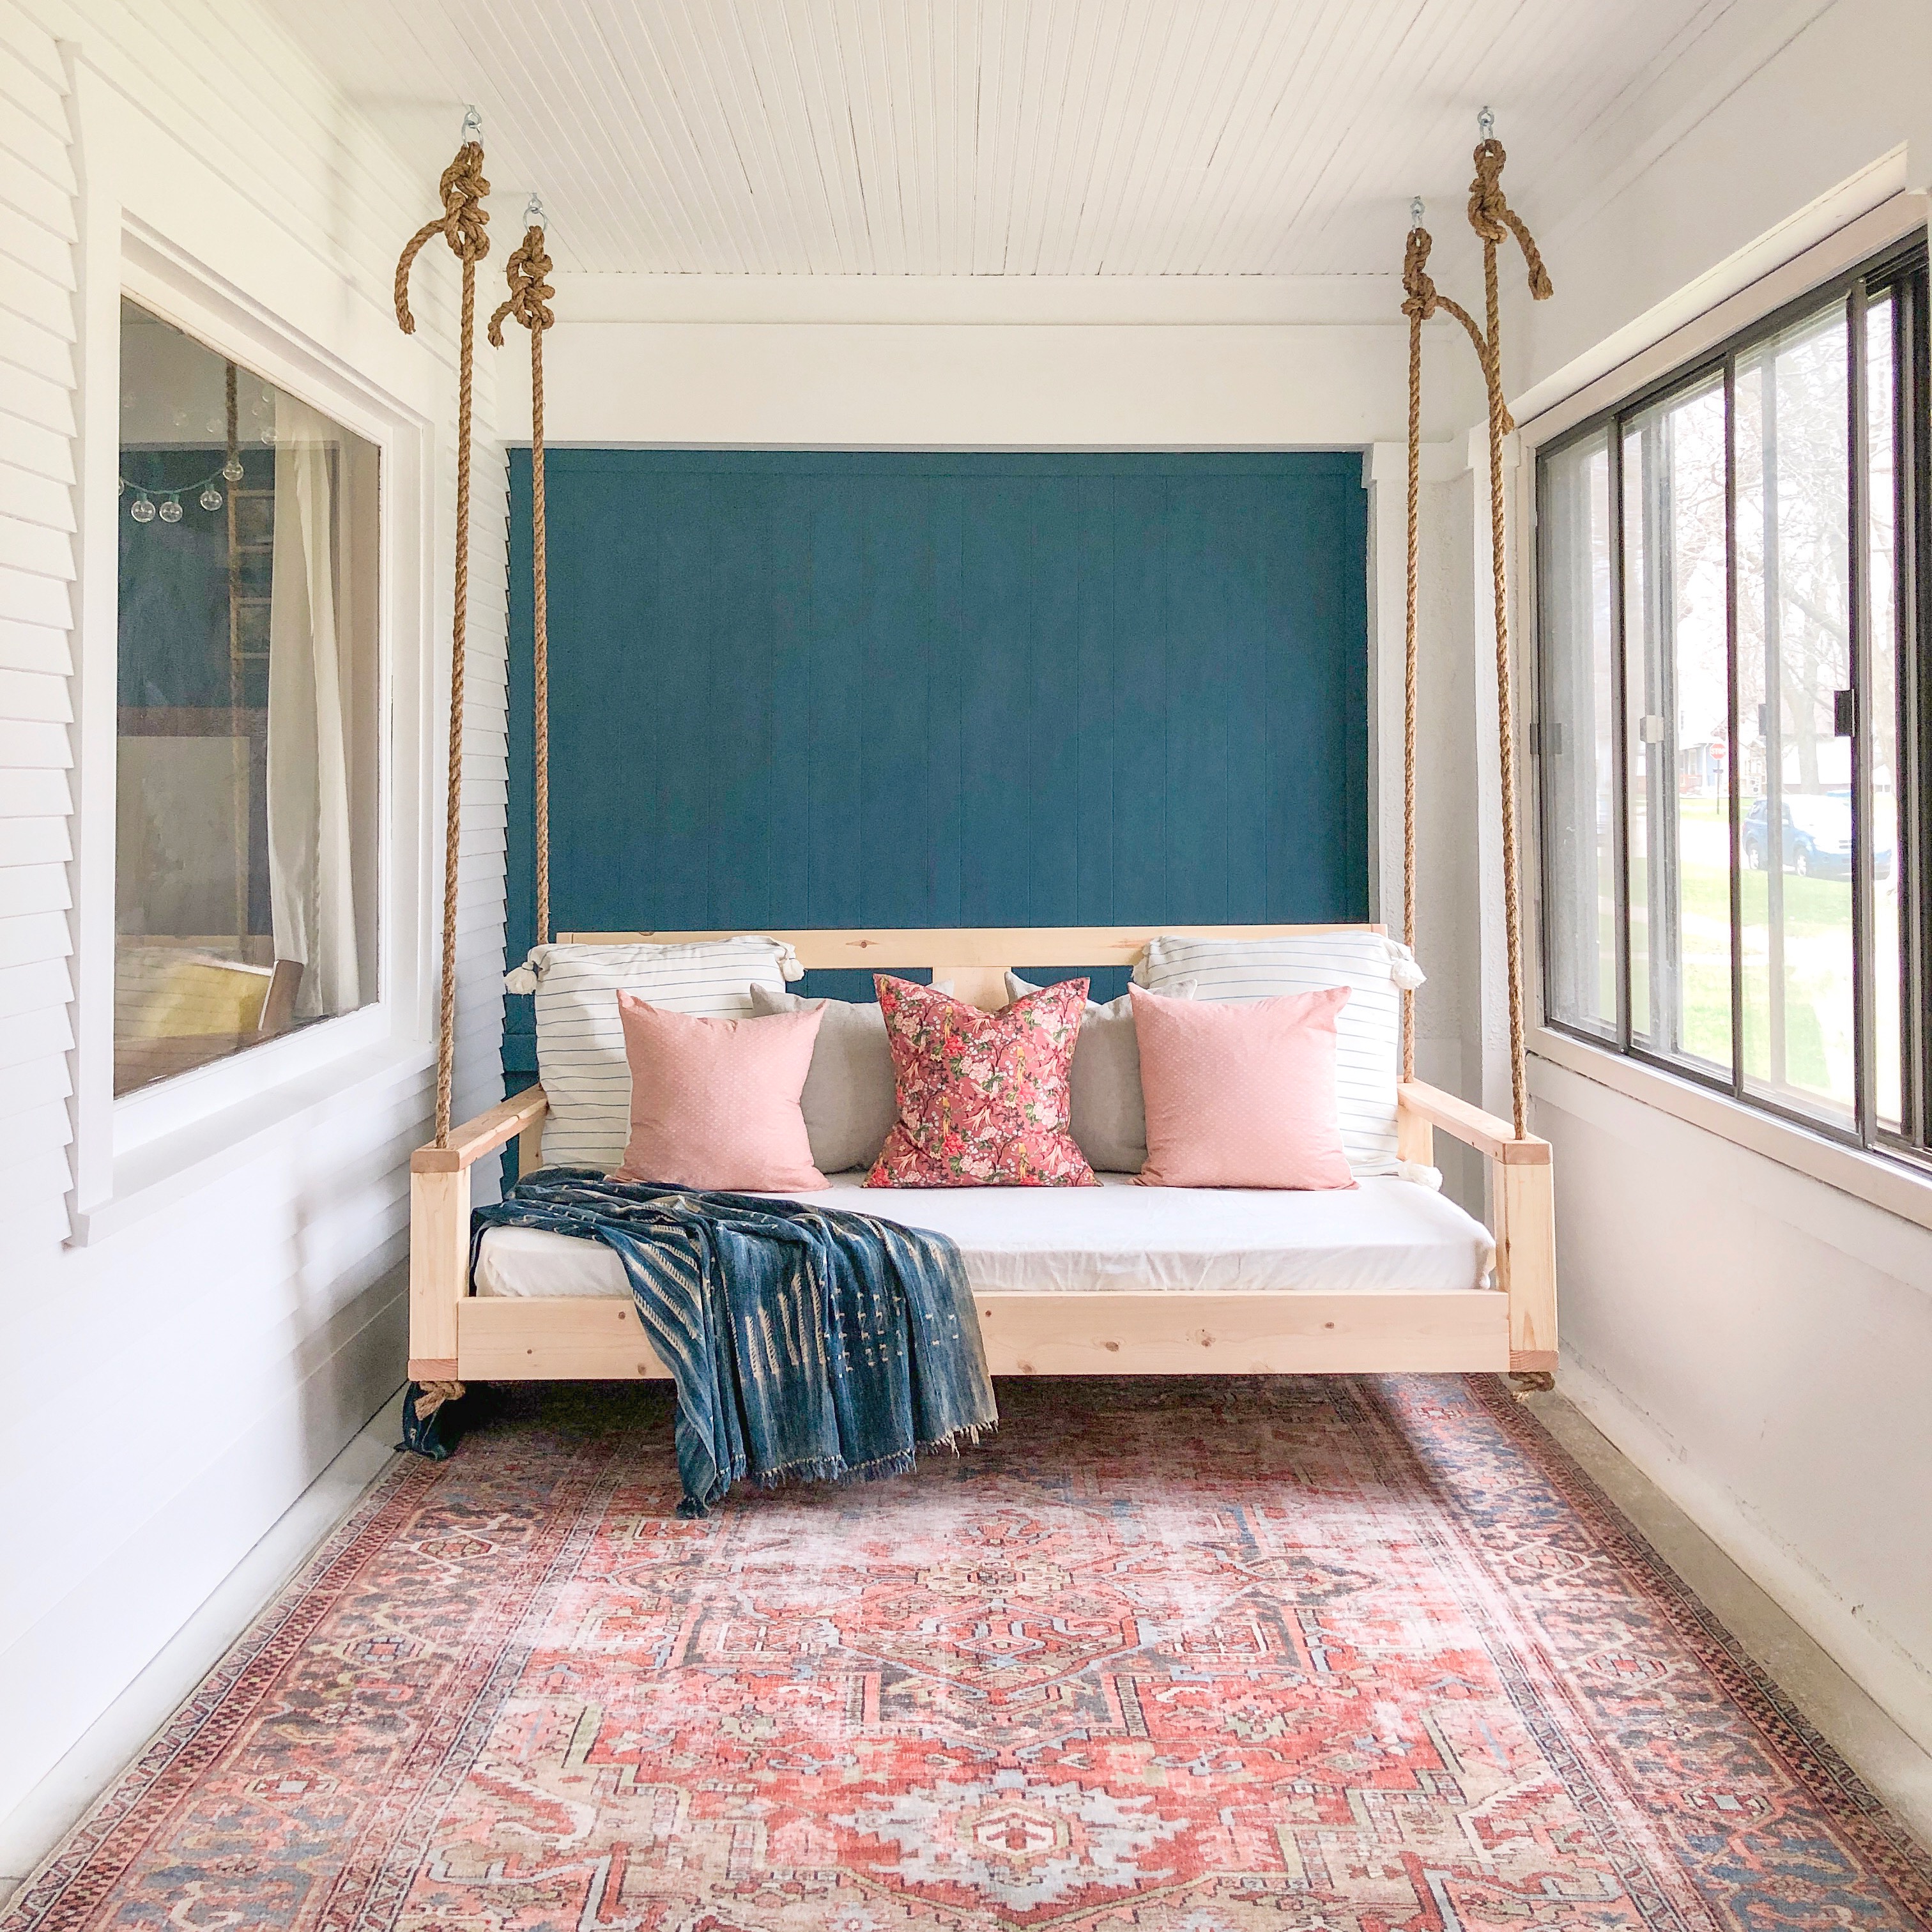
DIY $150 Bed Swing and Painted Concrete Floors: One Room Challenge Week 4

If you’re finding me through the One Room Challenge, welcome to my home on the internet! I’m Avery and I live in a charming 1910 Craftsman style home in rural Iowa with my husband. You can learn more about me here, and see some of my previous design work in my kitchen, and my Fall 2018 One Room Challenge: Cozy Eclectic Master Bedroom Reveal. My design style is cozy, whimsical, and collected. You can follow along with my homemaking adventures on the Holland Avenue Home Instagram.

Catch up on all of my progress for the Spring 2019 One Room Challenge:

Week 1: High Style, Low Budget Sunroom Transformation

Week 2: DIY Tree Stump Coffee Tables

Week 3: The Power of Paint

This week, I’ll be sharing about my two biggest projects- the DIY bed swing and the painted concrete floors!


$150 DIY Bed Swing

Last weekend, Ben’s sister and her family came to stay with us. Sarah and her husband, Kirk, have two little boys, and live just a few hours away in Des Moines. Kirk is an incredibly talented woodworker, and graciously agreed to help me build a bed swing. By “help me”, I mean that he did all of the difficult stuff like designing the plans, leading the construction, and teaching me how to use tools! I sent him a photo of a bed swing I liked, and gave some general instructions about how I wanted it to look. I wanted simple, clean lines, an “X” detail in the back, and thick rope for hanging from the ceiling.

Kirk designed a plan that uses dimensional lumber (aka 2×4’s and other sizes that you can buy precut, and just need to cut to length). I already had an extra twin mattress, so the plans are designed for the mattress to rest on a sheet of plywood.

The plans for this bed swing will be available to purchase on Etsy for $10.

Plans will include a detailed, measured drawing and a list of materials. Like I mentioned before, I already had the twin mattress, which saved money in my final cost.

I will send out a link (through my newsletter) to the plans on Etsy when they are finished. If you want to purchase the plans, make sure you’re signed up for the Holland Avenue Home newsletter to be notified when they are available! (I only send a few emails a year- nothing spammy!)

It took us one Saturday and about $150 in materials for the swing!

We used 40 feet of 1″ rope from Menards ($40) and spent $110 on the lumber (including a 4’x8’x1/2″ sheet of plywood).

img_8996.jpg

Here is the swing in our freshly painted porch. Seriously every single square inch of this porch has been painted over the last two weeks! I’ll address the floor painting later.

We set up shop in the front yard, just outside of the front porch.

This blog post won’t be a step-by-step tutorial, because it is realistically a more advanced project. If you have a friend or family member that is at least somewhat familiar with building things, you should be able to combine this rough outline with the detailed plans in order to build your own swing! We used a combination of screws, kreg-jig screws, wood glue, and a nail gun to assemble the frame.

IMG_8745

The first step was to create the base for the outside of the frame and the plywood. After that, Kirk drilled 1″ holes in each of the 4×4″ corner posts, and attached the posts.

IMG_8754

The back is on a 10 degree angle, which is very subtle but makes a big difference in comfort! After the corner posts, we built the back support and X detail. The last step was to attach the armrests, which also had 1″ holes that aligned with the holes in the corner posts.

We waited to attach the plywood until the swing was hung so that we could place the ladder inside of the frame for easier hanging.

To hang the swing, we first threaded the rope through the corner posts and armrests. We used 10 feet of rope on each corner to hang from an 8.5 foot ceiling. The triple knots at the top take up quite a bit of material.

We had 1″ holes for 1″ rope, and threading the rope created a lot of friction. I had the idea to cover the bottom few inches of the rope in painter’s tape to create a smoother surface. It worked great! After the rope was threaded, we tied a single knot on the bottom of each rope.

IMG_8756

Kirk demonstrating his strength before we tackled the actual hanging part! I was nervous for this, but it was a breeze!

IMG_8757IMG_8758IMG_8759

The most important part of hanging your bed swing is to make sure that you screw your eye hooks into ceiling joists.

You can find the joists with a magnetic stud finder. Our ceiling joists run horizontally across the width of the porch. We were pretty limited by the amount of ceiling joists, and chose to hang from the second and third joists so that there would be plenty of room for the swing to move back and forth. (The back of the swing is about 2 feet from the wall. Your ceiling joists may be closer or further away from your wall, but they are typically the same distance apart from one another.) It was about 40″ between holes on the armrests, and about 28″ between joists, meaning that the ropes come in about 6″ on each side to be 28″ apart on the ceiling.

Once we determined where the ceiling joists were, and marked where the hooks needed to be installed, Kirk drilled holes in the joists. He screwed in the lag eye screws by hand. We bought the kind that had attached hoops on the bottom, so that the rope had plenty of space to thread through. Lag eye screws will have a weight limit. Ours are 350lbs.

Once the eye screws were inserted, we propped up the swing on two 5-gallon buckets, and threaded the rope through the eye screws. Kirk tied triple knots on each of the ropes.

IMG_8765IMG_8780

The hanging part was a lot easier than I expected it to be! Here we are, enjoying our work after a long day! I learned how to use a lot of different tools, and really enjoyed seeing a project come together. My first comment after we kicked out the buckets was, “This wasn’t here this morning!” It was very satisfying and rewarding to build something from scratch. It was fun to spend time with Kirk, too! We both have really strange senses of humor, so the construction puns were rolling all day. (Examples: “Don’t screw it up”, “Did you go to the hardware store and get board?”, “You saw it here first”)

While we were building the swing, my sister-in-law, Sarah, sewed pillow covers! I found four down insert pillows at our local thrift store for $1 each, and a set of L.L.Bean flannel sheets for $2. The fitted sheet covers the mattress, and Sarah used the flat sheet on the backs of the four pillows. Two of the fronts are covered in Annie Sloan linen, and two are covered in pillowcases I found on clearance at Target. The fabric was a little too pink, so Sarah tea-dyed the fabric before sewing them to give it a more muted, peachy, vintage feel!

IMG_8851

Like I said, I know that I didn’t give a step-by-step “then you screw this piece to this piece” tutorial. But if you want to build a swing of your own, you’ll need a few different power tools and a knowledge of how to use them, which will probably include either a handy friend or your own understanding of how to work from a detailed plan! If you have any other specific questions about the bed swing that I didn’t answer, please feel free to reach out through my Contact page.

The other big progress I made this week was painting the concrete floors!

Painting the Floors

Here is a reminder of what the concrete floors looked like before. They were a strange, freckled concrete that just looked dirty. I wanted to give them a fresh look, and needed to use heavy-duty epoxy paint since this is our main entrance for guests. We live in Northwest Iowa where it is basically winter for half of the year, so this porch sees a lot of snowy boots. My friend had leftover epoxy floor paint from his business, and gave it to me for this project!

58375533_394853021102472_6109931547991736320_n

I used a Sherwin Williams two-part epoxy paint. Epoxy has a part A and part B, and it activates when they are mixed together. It is incredibly toxic, and you absolutely need to wear a respirator and only use it in a well-ventilated space. I had to keep checking our weather forecast to make sure I could paint on a warm day (with no rain for 2 days) so I could keep the windows and door open.

For my 300 square foot porch, I used a 5 gallon bucket to mix half a gallon of A and half a gallon of B, and about a quart of lacquer thinner. (You mix parts A and B on a 1:1 ratio, and will need a quart of lacquer thinner per gallon of epoxy. I started with half a gallon of both A and B, and had some left over.) It is important to mix them really well, and whatever you mix needs to be used within 3ish hours. I opened all of the windows and door, donned my respirator, and finished the painting in about two hours.

Screen Shot 2019-04-24 at 6.25.31 PM.png

Screen Shot 2019-04-24 at 6.26.05 PM.png

After cutting in the edges with a brush, I used a 3/8 nap roller on a pole to roll the rest of the floors. I did the sections to the right and the left first, then painted myself out the center. I locked the door behind me, and left the floors to dry for at least 24 hours before coming out to close the windows! We put a towel under the front door that opens to our living room to help with the smell, but it is already gone the next day.

I invented some interesting yoga moves in the process. My favorite was the “One-Legged-Painter”, which is what I became when I stood behind the bed swing on one foot, pushing the swing as far away as I could with my other foot so that I could roll the floor underneath. There was also the “Hunchback of Holland Avenue”, which is pictured above as I applied pressure to the just-barely-too-short-for-comfort roller handle.

Here is a before and after of the floors! I knew it would make a huge difference, but WOW!!! It feels so fresh and clean compared to the freckled concrete.

58375533_394853021102472_6109931547991736320_nIMG_8996

They need to cure for 7 days before I bring our furniture and rugs back out. They currently look a tiny bit streaky from the roller, and I’m wondering if it is because they are still curing. Even if they do have subtle roller marks, it is still a drastic improvement over the previous floors. Looking back, I maybe could’ve applied the paint a little thicker, but epoxy is pretty thick and I didn’t want to over-apply.

This week was full of the biggest progress yet, and I’m getting pretty close to the finish line! The only things I have left to do are pleat and hang my curtains, create my floral artwork for above the bed swing, and paint the window trim. After that, it will just be final styling and shooting the space! Ben and I are absolutely thrilled with the progress so far, and I am giddy when I think about how much we will love the finished space! We’ve already had a lazy day on the bed swing, which consisted of a Game of Thrones marathon to catch up before the new season’s second episode premiered. Monday was Ben’s day off (and the day before floor painting), so we spent our afternoon curled up on the bed swing with Louie while it rained. I can’t wait to host friends on this porch all summer!

I’ve learned a lot during this round of the One Room Challenge, but the biggest thing I’ve learned is to just “do it scared”. I’ve tackled a lot of new projects and new tools that scare me before I just jump in and decide to learn. It seems like everything I’ve done so far required overcoming fear and intentionally embracing new skills. I learned how to use an electric sander and worked with polycrylic for the first time for my DIY Tree Stump Coffee Tables in week 2. In week 3, I learned how to mask off a room for paint spraying, and even learned how to use the sprayer! This week, I learned how to use a saw, a nail gun, a krek-jig, and epoxy floor paint. I won’t be blogging about them until next week, but today I used Rit Dye to dye my Ikea curtains. It scared me, too, but they look great and I have a new skill in my arsenal! Every one of those projects scared me before I started, but so far they have all turned out wonderfully and have given me a sense of accomplishment.

If you have a DIY project that scares you, just do it scared! You may make mistakes, but don’t let that hold you back from learning new things. And who knows- maybe you’ll invent some new yoga poses in the process!


You can follow along on the Holland Avenue Home Instagram and Instagram Stories for behind-the-scenes progress before it comes to the blog. I’ll be sharing weekly updates here on my blog, and you can get reminders every time a post goes live through entering your email into the “brighten my inbox” tab to the right of this post.

Don’t forget to check out the design plans of the Featured Designers and other Guest Designers on the One Room Challenge Blog. 

Thanks for following along, and stay tuned for next week’s project- making Ikea curtains look high-end with Rit dye and pleating, and the final styling touches!

Catch up on all six weeks of my Spring 2019 One Room Challenge:

Week 1: High Style, Low Budget Sunroom Transformation

Week 2: DIY Tree Stump Coffee Tables

Week 3: The Power of Paint

Week 4: DIY $150 Bed Swing and Painted Concrete Floors

Week 5: Finishing Touches

Week 6: Before & After High Style, Low Budget Sunroom

ORC logo

avery- signature

Don’t forget to save this project on Pinterest!


BED SWING PINTEREST PROMO


The Power of Paint: One Room Challenge Week 3

If you’re finding me through the One Room Challenge, welcome to my home on the internet! I’m Avery and I live in a charming 1910 Craftsman style home in rural Iowa with my husband. You can learn more about me here, and see some of my previous design work in my kitchen, and my Fall 2018 One Room Challenge: Cozy Eclectic Master Bedroom Reveal. My design style is cozy, whimsical, and collected. You can follow along with my homemaking adventures on the Holland Avenue Home Instagram.

Welcome to week three of my One Room Challenge! We are officially halfway!

Catch up on all of my progress for the Spring 2019 One Room Challenge:

Week 1: High Style, Low Budget Sunroom Transformation

Week 2: DIY Tree Stump Coffee Tables

One Room Challenge Final Design Plan

This week, I saw monumental progress in my space through the power of paint.

I’ve said it before, and I’ll say it again: Paint is the easiest and cheapest way to completely transform a space. If you make smart and bold paint choices, you can achieve a significant transformation without breaking the bank.

This porch was previously pale yellow with wood trim around the windows. I started painting it white in 2017, and it took me hours because I was doing it all with a brush. One half of the walls are house siding, and the other half are either bumpy concrete, paneling, or window trim. A roller just didn’t work. So I spent hoooours on the porch during the warmer months, and only completed about 60%.

Enter, the paint sprayer.

Why, oh why, didn’t I just pursue this in the first place? Probably because I didn’t have any experience with a paint sprayer, and moving all of the furniture out seemed like a pain. (Spoiler: it was. But it wasn’t as painful as spending more hours of my life out here with a paintbrush.) My friend, JJ, is a painter, and said he could have the entire porch (including the ceiling) sprayed in under an hour if I already had everything prepped. SIGN ME UP.

The thought of me (a 5’2″ woman) painting a 300 square foot ceiling with a ladder and a roller just didn’t sound like my idea of a good time. (Shocking, I know.)

On Tuesday, Ben and I moved all of the porch furniture out. I filled the MANY nail holes, and cleaned the cobwebs and dust bunnies. My friend, Tessa, came over to show me how to use a masker. It is a neat tool that lets you load a roll of tape and a roll of paper, and puts them together for you as you roll the paper out and tape it to the windows. It is easiest to do with two people. We had the whole porch masked off in about an hour. When you are spraying, be sure to mask off EVERY SINGLE THING you do not want painted. We needed to cover the oak front door, which was difficult to do with the masker, so we left it cracked just a tiny bit, covered it with a tarp, and taped the tarp to the door frame so that overspray wouldn’t get into our house. That left about a three inch opening towards the bottom of the door where the tape wouldn’t hold it together, and our entire main floor was covered in a thin layer of white dust.

JJ was right- the painting took less than an hour. He showed up, set up his sprayer, showed me how it worked, and had the entire room finished in 45 minutes total. He let me do one wall, and I enjoyed using the sprayer!

Enough talk. Here are some incredible before & after photos of the white paint. I used three gallons of Sherwin Williams Extra White in a satin finish.

58375533_394853021102472_6109931547991736320_n.jpg

This one is Ben taking a picture… of me… taking a picture.

IMG_8827

Screen Shot 2019-04-17 at 9.09.08 PM.png

Louie, my furry photo assistant.

57321610_1316588201823524_9212160260951769088_n

IMG_8824.jpg

The “before” just felt kind of dirty. (Partially because it was… don’t @ me)

57227788_2140153096069258_8453363380835581952_n.jpg

This was the chaos of our living room after moving in the porch furniture and masking off the windows and doors. We’re going for a “maximalist meets flea market meets condemned house” aesthetic in here now.

Now for the big reveal…


57226314_424278258133508_3519793550965342208_n.jpg

IT FEELS SO CLEAN! We didn’t worry about masking off the floors, because they will be painted next week when the weather permits open windows. I can’t believe what a difference the white makes in this space. Before now, I could only dream of what awaited me on the other side of a long-term, on-again-off-again relationship with a paintbrush.

IMG_8833

Please excuse my paint buckets and mountain of paper and tape. Maybe this could be a new decorating style. I would call it “Reno-Chic”. It’s where you leave out all of your renovating supplies, but in an artistic and revolutionary way. So edgy.IMG_8834

I also started painting the navy accent wall, but not without a little lettering fun!

IMG_8626 3.jpg

The paint is still drying in this photo, so it looks streaky. I’m going to take the navy all the way up to the ceiling- I just ran out of time to finish it today! I also have to figure out whether or not to paint the half of that concrete column. It is incredibly bumpy, and I’m a bit worried I won’t be able to get a clean line. It will be covered by curtains, but I don’t want to leave a mess for future occupants of this house!

IMG_8832

57434219_2286432394939005_496216525397557248_n.jpg

Continuing the navy all the way to the ceiling will draw the eye upward, and ultimately make the space feel taller. I still need to paint the window trim on the outside walls (the ones on the right), and paint the inside of the door on the right. I would love to paint the actual front door because the stain is uneven and looks very worn, but I don’t paint original woodwork in this house since we don’t own it. (Except for the upstairs porch, where the window trim was damaged beyond repair and needed a coat of paint for protection.)

I used three gallons of white paint, and one quart of Annie Sloan Aubusson Blue for this space! I’ll be using a light grey epoxy paint for the floors next week, and black paint for the window trim. This was not a complicated or expensive update, but it made a very significant impact! I’m very excited to see how it all looks once the floors have a solid, fresh coat of paint as well.

That’s all I have for this week! The other major progress will be happening this weekend. My brother-in-law, Kirk, will be showing me the ropes (literally) of building a bed swing. I showed him my vision, and he created a custom plan for beginner builders that utilizes a twin sized mattress and dimensional lumber. You will be able to buy the plans if you want to tackle the project yourself! I’ll also be working on dyeing the curtains and painting the floors next week. Things are coming together quickly now, and I’m still enjoying the process and trying to have fun at every stage!


You can follow along on the Holland Avenue Home Instagram and Instagram Stories for behind-the-scenes progress before it comes to the blog. I’ll be sharing weekly updates here on my blog, and you can get reminders every time a post goes live through entering your email into the “brighten my inbox” tab to the right of this post.

Don’t forget to check out the design plans of the Featured Designers and other Guest Designers on the One Room Challenge Blog. 

Thanks for following along, and stay tuned for next week’s project- the bed swing!

Catch up on all six weeks of my Spring 2019 One Room Challenge:

Week 1: High Style, Low Budget Sunroom Transformation

Week 2: DIY Tree Stump Coffee Tables

Week 3: The Power of Paint

Week 4: DIY $150 Bed Swing and Painted Concrete Floors

Week 5: Finishing Touches

Week 6: Before & After High Style, Low Budget Sunroom

ORC logo

avery- signature


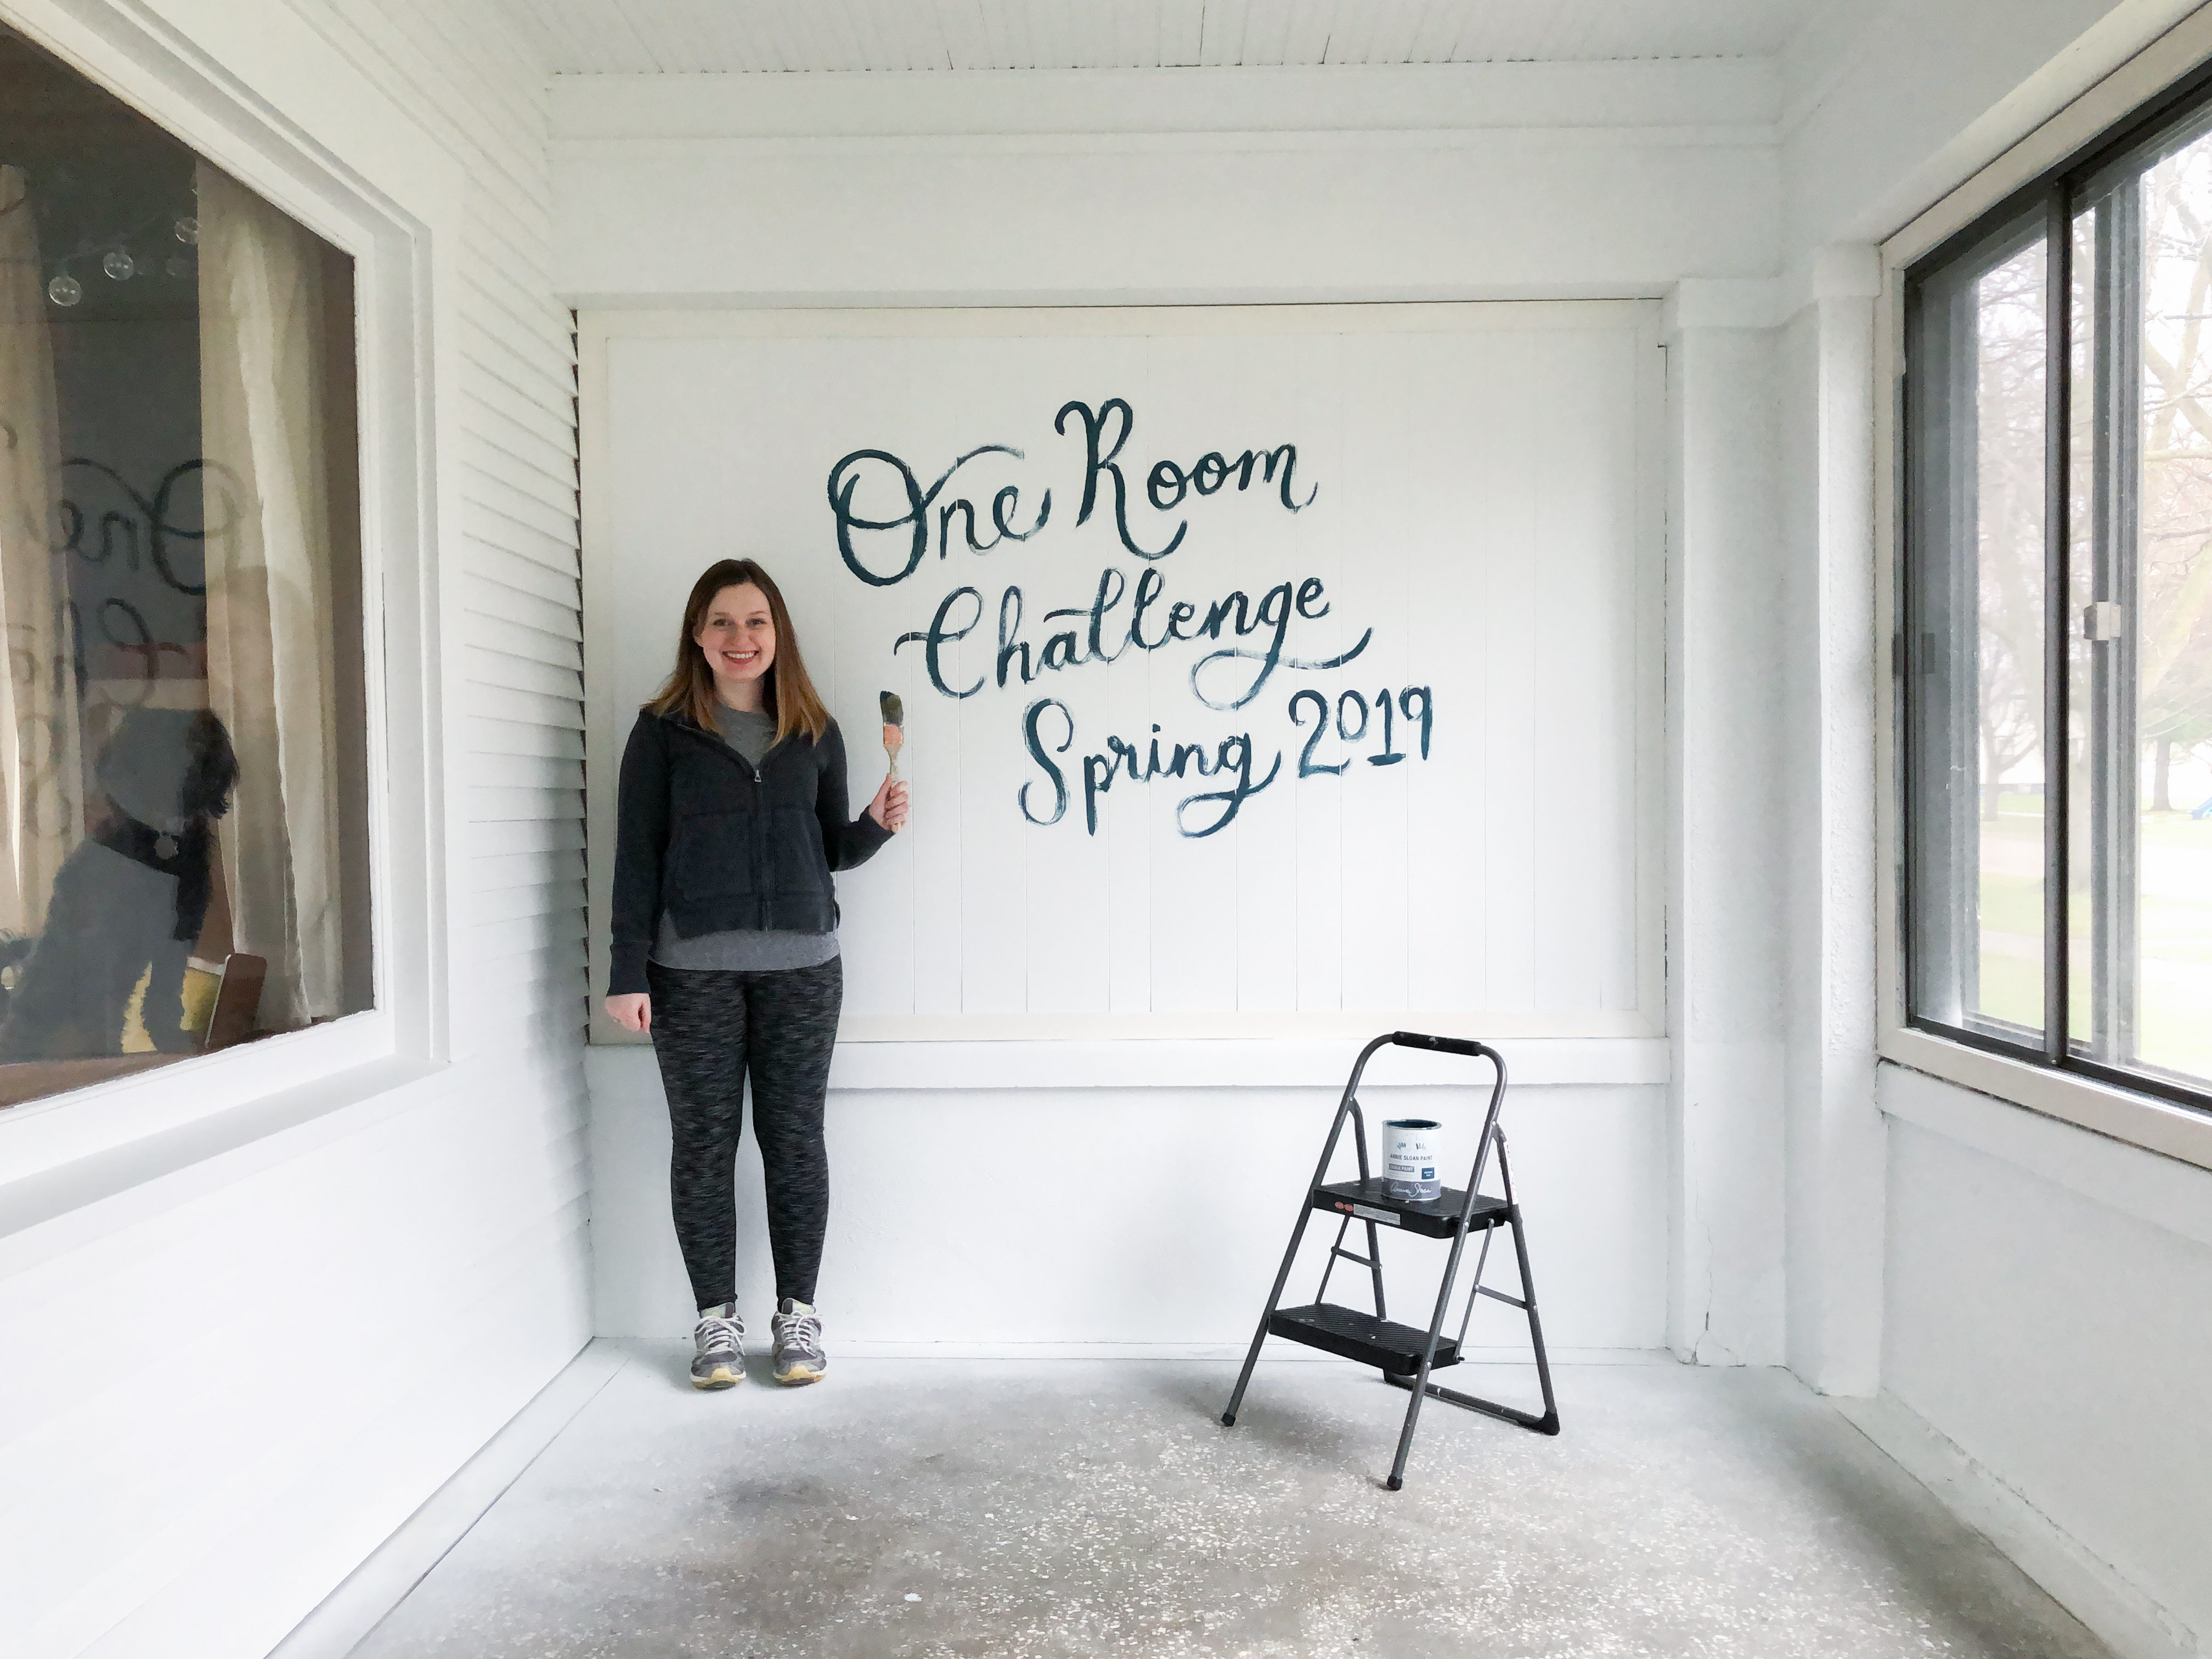
High Style, Low Budget Sunroom Transformation: One Room Challenge Week 1

If you’re finding me through the One Room Challenge, welcome to my home on the internet! I’m Avery and I live in a charming 1910 Craftsman style home in rural Iowa with my husband. You can learn more about me here, and see some of my previous design work in my kitchen, and my Fall 2018 One Room Challenge: Cozy Eclectic Master Bedroom Reveal. My design style is cozy, whimsical, and collected. You can follow along with my homemaking adventures on the Holland Avenue Home Instagram.

For this round of the One Room Challenge, I will be transforming our sunroom!

This space has incredible potential, and will be a dream come true once it is given a little love (and a lot of white paint). It is on the front of our house, and has three walls of windows. It is a “three-seasons” porch, meaning it is too cold to use in the winter. But for the glorious warmer months, we put this space to work for morning coffee, hosting friends in the evenings, and every excuse we can find in between.

For those of you that have been around Holland Avenue for a while, the “Before” of this space is the beloved “Granny Porch”. This space was (and still is) very sad underneath, so I created a temporary fix to add some cheer through bright colors and vintage decor from our wedding. We bought a mustard yellow floral couch for $30 on Facebook, which gave the sunroom some much needed “sunshine”. The space was fun, but the bones of it were still dreary. I plan to give this room new life through fresh paint, warm textiles, and a cozy bed swing. Here is a “before” photo of the “Granny Porch”.

IMG_8285-2IMG_6642

It is definitely “fun”, but I’m hoping to give it a more sophisticated (yet cozy and comfortable) upgrade. I’ll be focusing my energy on the far end that used to have the yellow couch, but the other end with my mid-century gingham furniture will be getting some love, too. This porch is 9×30, and presents some unique design challenges because of the long and narrow layout.

The “Granny Porch” served its purpose of concealing my half-finished paint job and the unpainted concrete floors, but a sad scene remains underneath all of the granny chic glory.

Here is a more recent view of what the porch looks like without anything to cover up the bones (and my less-than-half-finished paint job).

IMG_6774 2.jpg copyIMG_6775 copy

In a word? Rough. In another word? Potential. 

I believe that paint is the easiest and most affordable way to completely transform a room, and I plan to put that belief to work in this space.

The first step of transforming this room will be finishing my white paint job with the help of a friend who is a pro, and painting the concrete floors in a refreshing light grey.

After that, I plan to build a bed swing with the help of my awesome brother-in-law.

There will be plenty of other DIY and affordable elements (like the wood stumps I am getting for FREE), and I will also be taking advantage of a few blogger “perks” in the form of sponsored products. (Companies regularly “advertise” through bloggers, and will send us free product in exchange for advertising. I limit the number of advertising partnerships I take on, and am committed to only showing you products I either already use and love, or have specifically chosen with my mission and readers in mind.)

Enough “telling”… let’s get to the “showing”! I’ve tweaked this plan so many times over the last month, but allow me to reveal my final design plan for my “High Style, Low Budget Sunroom Transformation”!

One Room Challenge Final Design Plan

It will be a lot of work, but I am excited to finally give this space the love it deserves. I’m planning to include warm colors and textures to create a sophisticated-yet-comfortable lounge space. I’ve already received a few of the elements in the moodboard, and a few of the pieces are coming from other places in my home (because #budget). This design is what I am working towards, but certain elements may be tweaked and refined along the way. I hope you will follow along with me as I transform this sunroom through resourceful and attainable projects, and that you will be given the confidence to work with what you have to tackle a space of your own.

Be sure to follow Holland Avenue Home on Instagram for plenty of behind-the-scenes posts and sneak peeks of my progress. I’ll be sharing weekly updates here on my blog, and you can get reminders every time a post goes live through entering your email into the “brighten my inbox” tab to the right of this post.

Don’t forget to check out the design plans of the Featured Designers and other Guest Designers on the One Room Challenge Blog. 

Thanks for following along, and stay tuned for a High Style, Low Budget transformation!

Catch up on all six weeks of my Spring 2019 One Room Challenge:

Week 1: High Style, Low Budget Sunroom Transformation

Week 2: DIY Tree Stump Coffee Tables

Week 3: The Power of Paint

Week 4: DIY $150 Bed Swing and Painted Concrete Floors

Week 5: Finishing Touches

Week 6: Before & After High Style, Low Budget Sunroom

ORC logo

avery- signature

Follow along with the rest of my One Room Challenge posts!

Week 2: DIY Tree Stump Coffee Tables